
How I Built an MCP Server from Scratch?
A hands-on guide to giving your AI assistant real powers — like fetching stock news or placing an order — safely and easily.

“In the age of AI agents, the bridge between your local tools and the AI’s brain is the new goldmine — and MCP servers are that bridge.”
“If you want to make LLMs truly useful beyond text — make them talk to your APIs.”
What is an MCP Server?
The Model Context Protocol (MCP) is an open protocol that allows AI models to securely connect to external data sources, tools, and APIs.
Think of it like a translator between your API or local logic and a language model (like Claude, ChatGPT, or your own LLM-based app).
For example:
Suppose you have a REST API that fetches the latest stock news. With an MCP server, your AI model can call this API during chat, automatically retrieve fresh data, and reason on top of it — all without you copying and pasting data manually.
MCP makes AI aware of your system — turning passive chatbots into true contextual assistants.
For example, Swiggy or Zomato has APIs to place orders or search items. Imagine if an LLM app like ChatGPT could call those APIs directly — you’d just say, “Order a burger from McDonald’s on Swiggy”, and it would handle the rest.
To enable such secure, controlled connections between AI and real-world systems, we need a protocol — and that’s exactly where MCP servers shine.
Why Would You Ever Need an MCP Server?
Great question.
If you’ve ever thought — “I wish my AI tool could fetch data from my backend” — then you’ve already needed an MCP server.
MCP servers are perfect for:
Developers who want AI tools like Claude Desktop or ChatGPT to use their APIs directly.
Analysts who want LLMs to analyze live market or company data.
Product builders who want to extend AI chat interfaces with domain-specific capabilities.
Let’s take a practical example 👇
Imagine you’re a stock trader or financial analyst. You could build an MCP server that connects to your internal APIs — fetching latest stock data, earnings, or news — and have Claude answer “What’s new with TCS today?” directly inside your chat window.
No more switching tabs or running cURL commands manually. The LLM becomes your personal analyst interface.
Let’s Build an MCP Server
We’ll create a simple MCP server that fetches stock news and historical data.
Here’s the plan:
Create a dummy API that returns stock news.
Build an MCP server that connects to this API and Yahoo Finance.
Connect it to Claude Desktop to use it in chat.
🪄 Tip: You can create a simple API in minutes using GitHub Copilot (Agent Mode) or an LLM-based CLI.
Your API can return something like:
{
  “data”: [
    {
      “id”: “n-20251016-01”,
      “title”: “Startup XYZ announces new funding round”,
      “summary”: “Startup XYZ raised a Series C to expand internationally.”,
      “date”: “2025-10-16T12:00:00Z”,
      “source”: “TechCrunch”,
      “url”: “https://example.com/startup-xyz”,
      “symbols”: [
        “XYZ”
      ]
    }
  ],
  “meta”: {
    “count”: 1
  }
}
Step 1: Set Up the Project
Create a new folder and initialize your project:
mkdir mcp-stocks-server
cd mcp-stocks-server
npm init -y
npm install @modelcontextprotocol/sdk zod yahoo-finance2
We’ll be using:
@modelcontextprotocol/sdk→ official MCP SDKzod→ schema validation for inputsyahoo-finance2→ to fetch real stock data
Your package.json should look like this-
{
  “type”: “module”,
  “bin”: {
    “stocks-news”: “./build/index.js”
  },
  “scripts”: {
    “build”: “tsc”
  },
  “files”: [
    “build”
  ],
  “dependencies”: {
    “yahoo-finance2”: “^3.10.0”
  }
}
Create a tsconfig.json file as well as we will using typescript to write our server code-
{
  “compilerOptions”: {
    “target”: “ES2022”,
    “module”: “Node16”,
    “moduleResolution”: “Node16”,
    “outDir”: “./build”,
    “rootDir”: “./src”,
    “strict”: true,
    “esModuleInterop”: true,
    “skipLibCheck”: true,
    “forceConsistentCasingInFileNames”: true
  },
  “include”: [”src/**/*”],
  “exclude”: [”node_modules”]
}
Step 2: Create the MCP Server
Create a new directory as src and create a file index.ts in that folder.
Let’s start with the base imports and configuration.
import { McpServer } from “@modelcontextprotocol/sdk/server/mcp.js”;
import { StdioServerTransport } from “@modelcontextprotocol/sdk/server/stdio.js”;
import { z } from “zod”;
import YahooFinance from “yahoo-finance2”;

const yahooFinance = new YahooFinance({});
const NEWS_API_BASE = “http://localhost:3000”; // Running locally on port 3000
const USER_AGENT = “stock-app/1.0”;
This sets up our dependencies and constants.
We’ll use the local API (NEWS_API_BASE) for dummy news and Yahoo Finance for stock data.
Step 3: Create the MCP Server Instance
const server = new McpServer({
  name: “stocks-news”,
  version: “1.0.0”,
  capabilities: {
    resources: {},
    tools: {},
  },
});
Here we’re defining:
name: the identifier for our MCP serverversion: version control for compatibilitycapabilities: tells the AI what this server can do (we’ll add tools soon)
Step 4: Define Helper Functions
We’ll need two helper functions — one for fetching stock data, and one for fetching stock news.
1. Get Stock Data
async function getStockData(symbol: string) {
  try {
    const quote = await yahooFinance.historical(symbol, {
      period1: “2025-09-01”,
      period2: “2025-09-30”
    });
    return quote;
  } catch (error) {
    console.error(”Error fetching data:”, error);
  }
}
This function gets the past month’s historical data for any stock (e.g., AAPL, RELIANCE.NS).
2. Get News from Dummy API
async function makeNewsRequest(symbol: string): Promise<any | null> {
  const headers = { “User-Agent”: USER_AGENT, Accept: “application/json” };
  const url = `${NEWS_API_BASE}/v0/stocks/news?symbol=${symbol}`;

  try {
    const response = await fetch(url, { headers });
    if (!response.ok) throw new Error(`HTTP error! status: ${response.status}`);
    return await response.json();
  } catch (error) {
    console.error(”Error making NWS request:”, error);
    return null;
  }
}
This hits your local API and returns fake or real stock news depending on how the API is implemented.
Step 5: Add MCP Tools
Each tool in MCP is like a function that the AI can call.
Let’s add two tools — one for stock data, one for news.
Tool 1: get_stocks
server.tool(
  “get_stocks”,
  “Get historical data for stock symbol”,
  { symbol: z.string().describe(”symbol of stock”) },
  async ({ symbol }) => {
    try {
      const data = await getStockData(`${symbol}.NS`);
      if (!data)
        return { content: [{ type: “text”, text: `No data for ${symbol}.` }] };
      return { content: [{ type: “text”, text: JSON.stringify(data, null, 2) }] };
    } catch (error) {
      return { content: [{ type: “text”, text: `Error retrieving data: ${error}` }] };
    }
  }
);
Tool 2: get_news
server.tool(
  “get_news”,
  “Get latest news for stock symbol”,
  { symbol: z.string().describe(”symbol of stock”) },
  async ({ symbol }) => {
    try {
      const news = await makeNWSRequest(symbol);
      if (!news) return { content: [{ type: “text”, text: `No news for ${symbol}.` }] };
      return { content: [{ type: “text”, text: JSON.stringify(news, null, 2) }] };
    } catch (error) {
      return { content: [{ type: “text”, text: `Error retrieving news: ${error}` }] };
    }
  }
);
Each tool:
Defines what it does (
description)Defines input parameters (
zodschema)Returns formatted data that Claude (or another AI) can display.
Step 6: Connect and Run the Server
Finally, connect everything and start the MCP server.
async function main() {
  const transport = new StdioServerTransport();
  await server.connect(transport);
  console.error(”✅ News MCP Server running on stdio”);
}

main().catch((error) => {
  console.error(”Fatal error in main():”, error);
  process.exit(1);
});
Run it with:
npm run build
node ./build/index.js
You’ll see logs like:
✅ News MCP Server running on stdioYou can close the mcp server now as we want claude to run it.
Step 7: Connect to Claude Desktop
Once your server is running, connect it to Claude.
Open Claude Desktop → Settings → Developer → EditConfig
Add your configuration:
{
  “mcpServers”: {
    “stocks-news”: {
      “command”: “node”,
      “args”: [”<path from root to your project>\\build\\index.js”]
    }
  }
}
Restart Claude.
Make sure your API which returns stocks news is up and running.
Try asking:
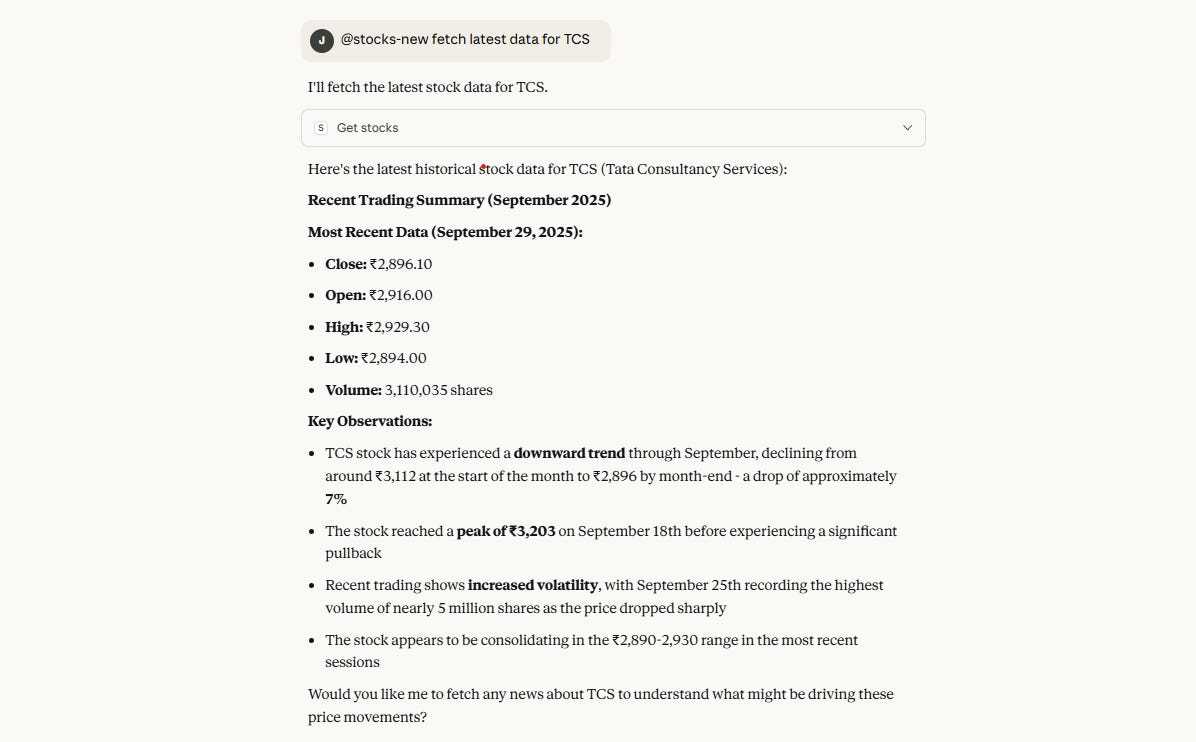
@stocks-news get_news symbol=AAPL // or any symbol you have configured in your API for testing

@stocks-new get data for TCS
Claude will now call your local API directly! 🎉
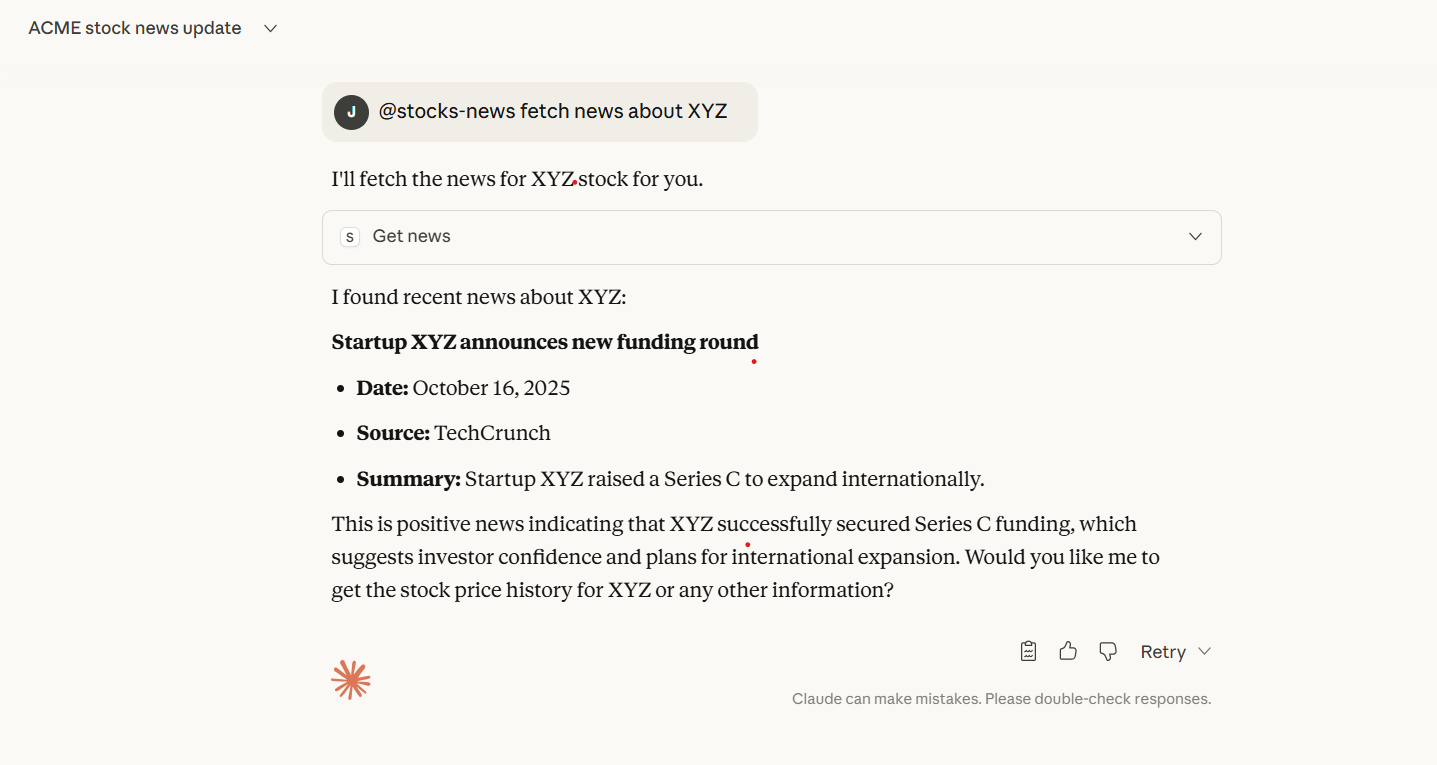
I loved how Claude uses the data from API and interpreted it.
Conclusion
The next generation of AI will not just think — it will act. Already happening actually!!
By building your own MCP servers, you’re giving AI secure, structured access to your world — APIs, databases, trading systems, or anything else you build.
Don’t just use AI. Make it use your data.
Stay ahead of the AI curve — build an MCP server today.
References
💌 Enjoyed this tutorial?
Subscribe to my Substack for more hands-on guides on AI agents, developer tooling, and next-gen automation.
This piece really made me think about the practical implications you hinted at in your previous article on truly autonomous AI agents, especially how we bridge the theory-practice gap. Your articulaion of MCP as the "translator" between APIs and LLMs is spot-on, highlighting a fundamental shift in how we design intelligent systems for real-world interaction.